The Art of Cooking Meat
Cooking meat is an art form.
In its essence, it’s actually simple: apply heat to a cut of meat until desired doneness is met.
There are, however, many different cuts of meat and many different ways of applying said heat, and, let’s face it, some methods of cooking work better than others for different cuts.
That is, if you want your meat to taste good, and not have the consistency of old shoe leather. Maybe you like old shoe leather. Hey, I don’t judge.
So, now that we’ve established that cooking meat is a little more complicated than it appears, let’s go over so basic techniques for cooking different cuts of different meats. I am just going to go over the most basic – there are other ways, but they either require specialized equipment or significantly more attention than they’re worth for everyday cooking.
But first, some overall tips and tricks:
1 – Salting your meat before cooking (and, I mean, at least 30 minutes before cooking) is essential. Not only does this start to break down the connective tissue in your meat (thus tenderizing it), but it also brings out the best flavor in your meat. Seasoning just before cooking won’t do too much, as much of the seasoning will simply fall off during the cooking process. Likewise, seasoning after cooking can quickly overpower a dish. Be sure to apply an even coat!
2 – You can add flavor to the meat by applying a dry rub before cooking or marinating your meat in a wet mixture.
A dry rub usually consists of dried herbs and spices, breadcrumbs, cheese, oil, and mustard. Make sure to toast your spices (and grind your own where you can) in a dry pan just until you smell it, and refrigerate your meat for a minimum of 30 minutes after evenly applying your rub. This allows the meat to absorb the flavors, which often fall off in the cooking process – which, as a side note, help to make an excellent pan sauce.
A marinade, on the other hand, is a blend of herbs and spices that is combined with oil, and sometimes acid. The oil protects food from intense heat, in addition to acting like a glue to hold the other flavors on the meat while cooking. The acid gives another layer of flavor to your meat, as well as changing the texture (like the firming that occurs from the citrus juice in a ceviche). With tender or delicate meats, less time is needed to impart flavor with a marinade – and, if your marinade is highly acidic, your meat should be marinated for no more than 15-20 minutes. You can also brush your marinade onto meats during cooking for additional flavor – this is particularly useful for marinades that have sugar in them (you don’t want the sugar to burn). Sauces/Marinades with high quantities of sugar should be delayed in their application to avoid burning. Leftover marinade can be made into a sauce, just be sure that it is boiled for a few minutes to kill off any lingering bacteria.
3 – If you are stuffing meat (let’s say a chicken breast), keep in mind that the stuffing must itself be brought to 165 degrees to kill off any bacteria that may have leeched from the raw meat. Naturally, at times the meat you are cooking will overcook as a result – many restaurants will avoid stuffing altogether, in favor of making each component separately, in which case the stuffing would be called a dressing.
Determining Doneness in Meat
Often when cooking at home, the biggest issue people face is determining when a piece of meat is properly cooked. While using a meat thermometer is the most precise way of cooking meat to temperature, as you cook more and more you will find different ways to help you determine when a piece of meat is properly cooked – all using your different senses. This can be very valuable if you don’t want to (or can’t) cut into a piece of meat.
Meat that is cooked well:
- Will have an easy-to-identify smell (ie, will smell like beek/chicken/pork, etc)
- Will be easy to cut/chew
- Will be firm (the more firm the more “well done” it is – see chart below)
- The juices will run clearer the more cooked the meat is (redder = rarer, more clear = cooked through)
If you want to go by (internal) temperature, remember that the temperature must be taken for the middle of the thickest part of your piece of meat. Taking meat off of the heat slightly prior to doneness helps keep it from being overcooked (as cooking will continue after it is removed from the heat source). Here is a temperature guide to help:
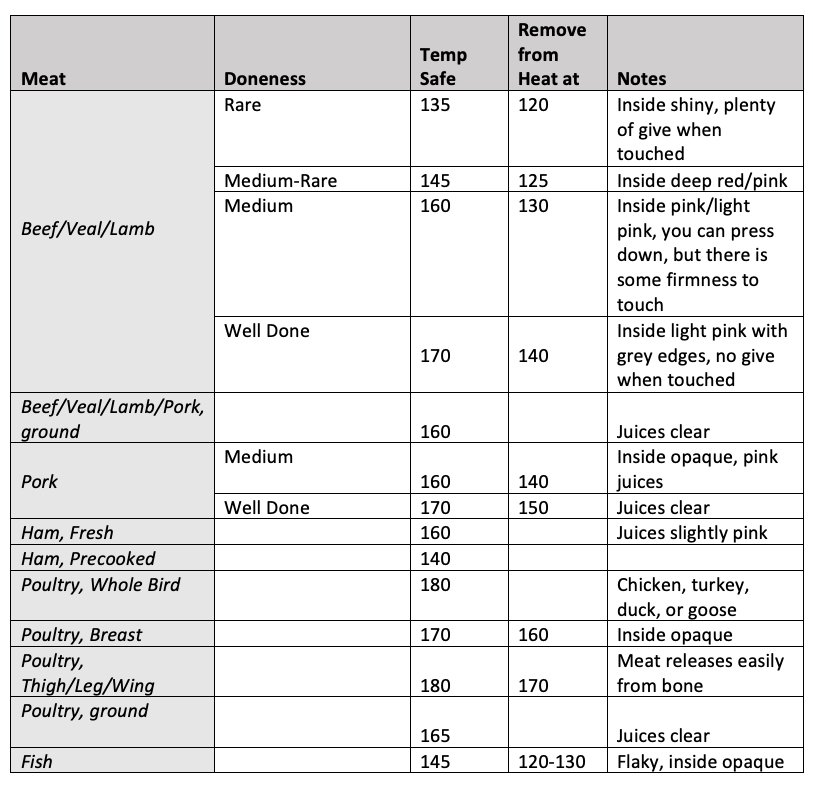
As you experiment, it is best to find the “doneness” that suits your tastes the best, and learn what that looks, smells, and feels like, so that you can replicate it easily and quickly.
Now, let’s discuss some of the easiest (and most flavorful) ways to cook meat:
Roasting
Works Best With: Primary Cuts (Breast, Tenderloin)
Equipment Needed: Oven-safe pan
Method:
- Pat meat dry with paper towel
- Sear meat on medium heat (heat to medium before placing meat in pan – oil should sizzle, but not pop/sputter) – this moves juices toward center of the meat, resulting in less juices lost
- Three-fourths of the way through the cooking process, add fat to pan. The fat will mix with the juices and create a basting sauce. You can now transfer meat to the oven to finish (baste often), or continue to cook on stovetop until meat is cooked (also basting often)
- Let food rest before cutting/serving
Braising
Works Best With: Tougher cuts with more connective tissue (secondary cuts) – the long/slow cooking time breaks down the collagen and sinew, resulting in a tender meat
Equipment needed: Oven-safe pan (deep enough to fit cut of meet)
Method:
- Sear meat on medium heat until brown on all sides
- Add liquid, bring liquid to simmer
- Cook uncovered in 250-350 degree oven with liquid at constant simmer, basting periodically
- Meat should be cooked long/slow, until it is falling off the bone
- Allow meat to cool in liquid (meat will re-absorb some of the cooking liquid)
- Pour liquid into saucepan, straining, and reduce for sauce
Shallow Poaching
Works Best With: Naturally Tender/Quick Cooking Foods, Small Foods (Fish, Shellfish, Chicken Breasts)
Equipment needed: Oven-safe saucepan
Method:
- Sweat Vegetables (usually onions, carrots, celery)
- Add liquid (stock, wine, vinegar, citrus juice, etc) no higher than 1/3-halfway up food
- Cook on stovetop/oven – do NOT boil, or cook until poaching liquid is 160-180 degrees, and then transfer to oven, covered, until meat is done
- The leftover poaching liquid can be reduced and combined with additional acid or butter to form a pan sauce for serving.
As always, the more that you experiment with each cooking method, the easier it will become. I’ll be featuring a meat recipe (or 2), as well as a vegan option later this week to help you practice!

